Crude DNA Isolation from Seeds
Overview
Teaching: 10 minutes
Exercises: 30 minutesQuestions
How to crude DNA Isolation from seeds?
Objectives
Extract PCR-only quality DNA from a large number of samples.
SAFETY INFORMATION
Before you start, look up the MSDS sheets for all the chemicals used in this protocol. Ensure you follow any recommendations/rules regarding wearing personal protective equipment, emergency procedures, and clean-up/disposal procedures. If you have any questions contact your supervisor or lab manager.
This protocol provides a quick means to extract PCR-only quality DNA from a large number of samples.
Supplies needed:
- Tweezers
- Toothpicks
- Sterile Water
- 96-well PCR micro-plate
- Heating block set to 95°C
- 0.5M Tris-HCL (pH 8.0)
- 0.25M NaOH
Protocol:
Photo of a bean with the seed coat scraped away on the front side.There is a small amount of cotyledon tissue on the tweezers to demonstrate the amount you need for extraction. Try to keep this amount consistent between samples. Ensure you only take a sample of the cotyledon and do not damage the embryo.
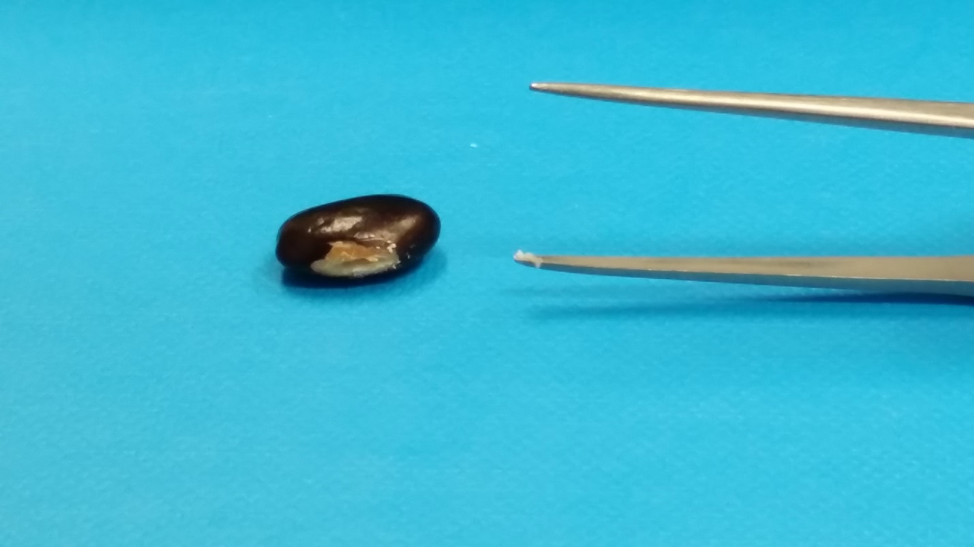
- Using Tweezers (or a Razor Blade or Scalpel – whichever you find easiest), chip off a small area of seed coat to expose the cotyledons.
- For beans and lentils, seed coat tissue is derived from maternal parent and does not represent genotype of the embryo. Therefore avoid contaminating sample with seed coat tissue.
- Avoid damaging the embryo when chipping the seed coat.
- Place a 96-well PCR micro-plate on ice. Add 2 µl of sterile water to each well.
- Add a small 1-2 µl drop of water to the exposed section of the cotyledon. It is typically best to line up a series of seeds at once.
- Using a clean toothpick scrape a small amount of seed flour. Transfer the collected sample into the PCR well by dipping and gently swirling the toothpick into the water at the bottom of the sample well.
- Only a small amount of flour is needed. More is NOT better.
- Be as consistent as possible with regards to the amount of tissue being collected.
- Repeat Steps 3-5 until all samples are collected.
- Once all samples are collected add 10 µl of 0.25M NaOH to each well.
- Seal samples. Shake/Vortex briefly on plate-mixer if available. Place plate on 95°C heating block for ~2 minutes. Remove and leave at room temperature.
- Carefully remove seal and add 15 µl of 0.5M Tris-HCl (pH 8.0) to each well.
- Seal the samples. Shake/vortex on plate-mixer if available. Place plate on 95°C heating block for ~2 minutes. Remove and place on ice.
- Samples can be used immediately, stored in the fridge for a few days, or frozen indefinitely.
- For regular PCR, use 1.0-2.0 µl of sample in a 15-25 µl PCR reaction. For KASP-based PCR, dilute the DNA by adding 200 µl of sterile water. Then use 2.0 µl of diluted DNA in a 8-10 µl KASP reaction.
Important Notes:
- For best results, try to be as consistent as possible with the amount of tissue collected. As with any PCR, KASP-based PCR works best when starting samples have same amounts of DNA. By being consistent, you should not have to quantify the DNA.
Key Points
Read through Safety Information before you start the experiment.
Avoid contaminating sample with seed coat tissue when handling beans and lentils.
Avoid damaging the embryo when chipping the seed coat.
Small amount of seed flour is good enough; more is not better.
Try to be as consistent as possible with the amount of tissue collected.
Micro-CTAB DNA Extraction Procedure for Fresh Material
Overview
Teaching: 15 minutes
Exercises: 2.5 hoursQuestions
How to extract DNA from fresh pulse tissues?
Objectives
Use CTAB Extraction Buffer to help extract DNA from fresh pulse crops.
SAFETY INFORMATION
Before you start, look up the MSDS sheets for all the chemicals used in this protocol. Ensure you follow any recommendations/rules regarding wearing personal protective equipment, emergency procedures, and clean-up/disposal procedures. If you have any questions contact your supervisor or lab manager.
The following protocol can be used to extract DNA from all pulse crops:
- Collect a small coleoptile (2.5 cm) or leaf tissue (~100 mg) sample from the plant. The tissue should be placed in a 1.5 mL micro-centrifuge tube and placed on ice.
- Grind the plant tissue in the tube using a sterile micro-pestle.
- Add 500 µl of 65°C 2X CTAB Extraction Buffer. Mix thoroughly by inversion.
- Incubate tubes in a 65°C water bath for 5-10 minutes.
- Add 500 µl of chloroform/isoamyl-alcohol (24:1). Gently mix the 2 phases together.
- Centrifuge the samples @ 13 000 rpm for 10 minutes.
- Transfer the upper, aqueous phase to a new 1.5 mL micro-centrifuge tube.
- Add 1/10 volume (~50 µl or 2-3 small drops) of 65ºC 10% CTAB Extraction Buffer. Mix thoroughly by inversion.
- Incubate tubes in a 65°C water bath for 5-10 minutes.
- Add 500 µl of chloroform/isoamyl-alcohol (24:1). Gently mix the 2 phases together.
- Centrifuge the samples @ 13 000 rpm for 10 minutes.
- Transfer the upper, aqueous phase to a new 1.5 mL micro-centrifuge tube.
- Add 800 µl of cold 95% ethanol. Mix thoroughly and place @ -20°C 30 minutes.
- Centrifuge the samples @ 13 000 rpm for 10 minutes.
- Decant the ethanol and add 500 µl of cold 70% ethanol. Mix thoroughly and place @ -20°C for 5-15 minutes
- Centrifuge the samples @ 13 000 rpm for 10 minutes.
- Pipette off the ethanol and let tubes air dry. Alternatively a speed-vac can be used.
- Resuspend DNA in 100 µl of sterile H2O.
- Add 1 µl of 10 mg/mL RNAse A.
Notes:
- Samples can be left overnight after adding the ethanol in step 13 or 15.
- While samples are incubating in the 65ºC H2O bath, they should periodically be mixed by inversion.
- Can expect an average product of ~200-400 ng/µl (x100µl) = 20 – 40 µg
- Have gotten over 1000 ng/µl = 100 µg.
- Final tubes should be labeled with complete name (for varieties) or population and line number (not entry number).
Key Points
Read through Safety Information before you start the experiment.
This protocol can be used to extract DNA from all pulse crops.
PCR Program for KASP Assays
Overview
Teaching: 20 minutes
Exercises: 1.5 hoursQuestions
How to use PCR program for KASP assays?
How to plot the data?
Objectives
Run PCR program for KASP assays.
Determine the lines score for each respective allele after plotting your data.
Notes before starting PCR:
- Because scoring is based on relative clustering, a minimum number of samples is recommended:
- No less than 8 for a well-developed, trusted assay
- No less than 16-24 for new, untested assays
- No less than 20-24 when trying to identify heterozygotes. In this case one should include homozygous controls.
- Always include a No Template Control (NTC)
- Ensure your RT-PCR machine/Fluorometer is set to take fluorescent readings at the wavelengths recommended for VIC and FAM (see KASP Manual)
The following is the standard PCR program we use for KASP assays using high-quality DNA (CTAB, Qiagen kits). We have added a few cycles to the program recommended by LGCBiosciences in the KASP Manual.
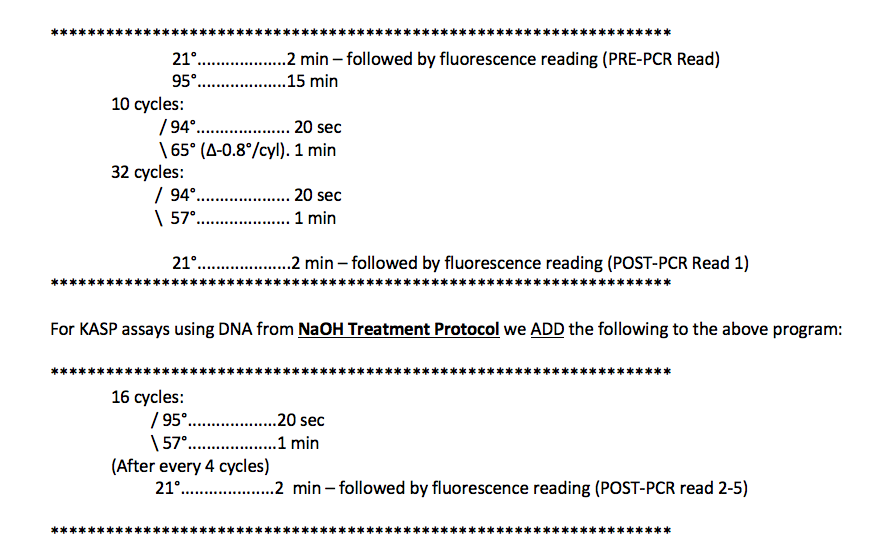
Notes on Program(s):
- The first step is a PRE-PCR Fluorescence Reading at room temperature.
- LGC Biosciences does not include a PRE-PCR reading in their recommendations, but we find that using a PRE-PCR read to standardize the data really helps to resolve the clustering. (see calculation and plot below)
- The second step is a hot start for the Taq. This is required to activate the Taq included in the KASP reagent.
- The first cycling step is 10 cycles consisting of a 2-step touchdown ranging from 65°C to 57°C (decreasing 0.8°C/cycle).
- This is recommended by LGC Biosciences. The touchdown helps to make the PCR program universal for all KASP assays despite minor differences in optimal annealing temperatures.
- The second cycling step consists of 32 cycles with an annealing/extension of 57°C.
- A POST-PCR Fluorescence Reading is then taken at room temperature.
- It is highly recommended that all fluorescence readings are taken at the same temperature, preferably at room temperature.
- We find, with high quality DNA (CTAB, Qiagen Kits), this is typically enough cycling to detect and score differences in fluorescence readings.
- For DNA taken from NaOH Treatment, or for assays where fluorescence readings are still too low after 42 cycles, we add more cycles.
- The Add-on consists of 16 cycles, with a fluorescence reading after every 4 cycles.
- The Add-on provides POST-PCR fluorescence readings at 4 more time-points. This allows one the flexibility to find the optimal time-point from which to take and plot the data.
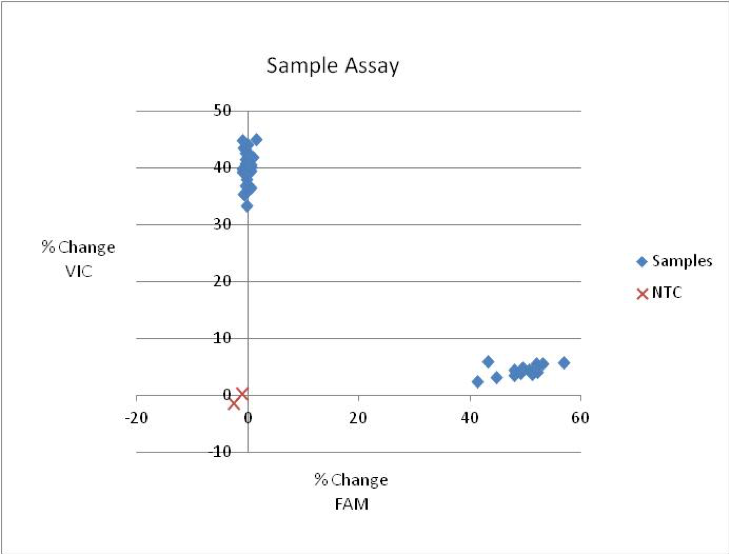
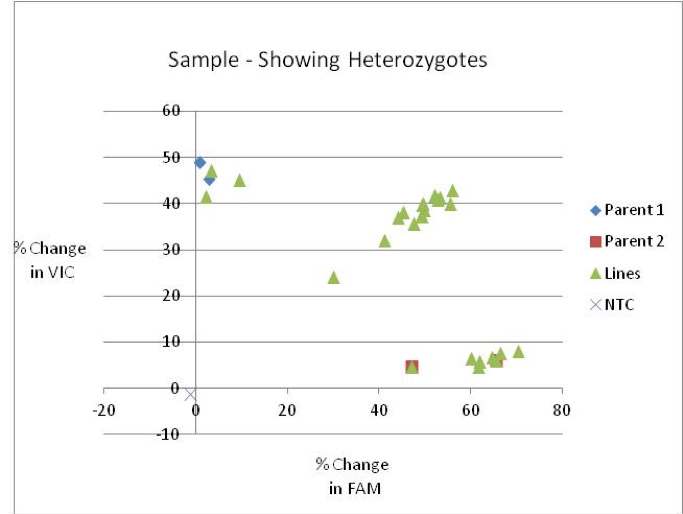
Plotting the Data:
- If the software you are using to view your plots is not user-friendly, or inadequate, use Excel.
- Transfer the PRE-PCR and POST-PCR fluorescence readings to Excel.
- Use the following calculation for both VIC and FAM fluorescence readings of all samples as well as the NTC:
- ((POST –PRE)/PRE) x 100
- The result will equal % Change in Fluorescence
- Generate a Scatter Plot using “% Change in VIC Fluorescence” vs “% Change in FAM Fluorescence”
- If the add-on program was used, you can plot all 5 time-points independently and compare to identify which results are easiest to score accurately.
- Once plotted you can determine which lines score for each respective allele.
Notes on KASP Assays:
- We find that all KASP assays are unique. Some work better than others. Some require more cycles than others.
- We find that KASP assays are consistent across DNA extraction methods (ie if it works well with high-quality DNA, it will work with DNA from NaOH treatments)
This is an example of a good KASP assay result:
This is an example of a KASP assay scoring heterozygous samples:
This is an example showing the plotting of 5 time-points from the same KASP run

Key Points
Read through carefully before performing this protocol.
Nuclei Isolation and High Molecular Weight DNA Extraction
Overview
Teaching: 20 minutes
Exercises: 2 daysQuestions
How to extract DNA from a tissue sample?
Objectives
Extract DNA from a fresh or frozen tissue sample.
This nuclei isolation protocol is an adaptation of the one reported by Zhang et al. (1995). The HMW DNA extraction protocol is one recommended by 10X Genomics.
Preparation
First make and autoclave these component solutions
- 1M Tris Base
- 3M KCl
- 0.5M EDTA (pH 8.0)
- DI Water
- 5M NaCl
10x HB (Homogenization buffer)
Wash Buffer (AKA 1X HB)
- 1xHB, MUST be made fresh on Day 1
Lysis Buffer
- Use 3 mL per tube (step 12)
Proteinase K Solution
- MUST be made on Day 1 for step 13
Day 1:
-
Add ice-cold 1x HB buffer (~10mL:1g tissue) to 5-7 g of fresh (or frozen) tissue. Homogenize thoroughly using a blender. Conversely frozen tissue can be ground using a cold mortar and pestle and then mixed into the 1xHB buffer.
-
Transfer the blended/ground tissue to an ice-cold 500 mL beaker. Gently swirl the contents with a magnetic stir bar for 5 minutes. (We keep the beaker in an ice bath while swirling).
-
Add Triton X-100 to make the final concentration 0.5% (which would be 0.025 ul/1mL of 1xHB buffer). Swirl the contents for another 5 minutes.
-
Filter the contents into a new beaker, through 2 layers of cheesecloth and a layer of Miracloth, by squeezing gently with gloved hands.
-
Aliquot the filtrate into 14 mL round-bottom test tubes, filling them about 2/3 full. (use as many tubes as necessary – and make it an even number of tubes for centrifuging).
-
Pellet the homogenate by centrifugation in a swinging bucket rotor at 1800 g, at 4°C, for 20 minutes.
-
Carefully discard the supernatant. Add approximately 5 mL of ice-cold wash buffer to each tube. Gently re-suspend the pellet using a small soft-hair paintbrush soaked in wash buffer. Top each tube up with another 5 mL of ice-cold wash buffer (10 mL in total).
-
Centrifuge the tubes at 57 g, at 4°C, for 2 minutes. This step should pellet and remaining intact cells and tissue residue. Carefully transfer the supernatant to new 14 mL round-bottom tubes.
-
Centrifuge the tubes at 1,800 g, at 4°C, for 15 minutes in a swinging bucket rotor. The resulting pellet should be white and of a uniform consistency. Repeat steps 7 - 9 if the pellet is still discoloured green or looks to still have other tissue residue.
-
Discard the supernatant, gently re-suspend the pellet in 8-10 mL of wash buffer (using a paintbrush), and centrifuge at 1,800 g, at 4°C, for 15 minutes in a swinging bucket rotor. Repeat step 10 2-3 times, or until the pellet is white and washes have no effect of pellet quality. During these 2-3 wash steps, the pellets can be resuspended in 4-5 mL of wash buffer, and the contents of tubes can be combined, to eventually reduce the number of tubes to 2.
-
Following final wash, discard supernatant and remove all traces of supernatant using a pipette.
-
Add 3 mL of Lysis Buffer to each tube. Gently re-suspend the pellet by inversion ~20 times.
-
Add 0.2 mL of 10% SDS to each tube. Add 0.5 mL of Proteinase K solution to each tube. Gently mix by inversion 5-10 times.
-
Digest the cell lysate overnight (12-18 hours) at 37°C in a shaking incubator set at ~50 rpm. (keep tubes in a rack, with only a slight tilt upwards from horizontal).
Day 2:
-
Add 1.2 mL of 5M NaCl to each tube. Mix by gently inverting the tube ~5 times.
-
Centrifuge at ~1000g, at 4°C, for 15 minutes.
-
Use a wide-bore pipette tip to slowly transfer the supernatant to a new 14 mL round-bottom tube. Add 8 mL of absolute ethanol to each tube.
-
Gently rock the tubes and look for the presence of DNA (a gooey clear or slightly whitish precipitant). Using a wide-bore tip (or possibly a glass loop if there is enough DNA), transfer the DNA to a microcentrifuge tube.
-
Air-dry the pellets (time may vary depending on consistency and volume). Do not over-dry.
-
Resupend the pellet in 100 uL of sterile water. Allow the DNA to completely resuspend overnight before attempting quality/quantity checks. Add more water (and/or very gentle mixing) if required.
Key Points
Tissue needs to be handled differently depends on storage temperature (fresh/frozen).
Both 1xHB buffer and Proteinase K Solution need to be made fresh on the day of use.
Only put even number of tubes into centrifuge.
Do not overdry your pellets.